Thursday, October 16, 2014

It's My Birthday All Over Again

Last year my mother got me a fabulous coffee table for my birthday from this great little antiques/consignment store in town.  At first I had really wanted to decoupage it.  Glueing stuff to stuff has always been one of my favorite hobbies.  I think at one point every piece of furniture in my house was covered with national geographic pictures and bottle caps.  For whatever reason I haven't had a ton or great luck with decoupaged coffee tables and kids though.  Over time they spill water or other miscellaneous liquids on top of the surface and the glue starts to peel, or if we aren't running the A/C at times it gets too hot and stuff will actually stick to the glue.  Maybe I'm doing something wrong...who knows.  I held onto this coffee table for over a year, just kind of eyeing it.  I finally decided painting it was what I wanted to do.  Initially I had imagined it multicolored, as I had a ton of different paint colors sitting out in the shed....but I ended up with this, and I'm pretty excited about it.
This is what I started with.  It was actually pretty cool exactly like it was, but I have been in the mood to paint, and it was a blank canvas that I was just staring at. 
On day one I just painted that whole thing a solid color.  I had some help from the friendly animals outside, which resulted in having to do an extra coat.  I decided to leave the legs natural, and I'm glad that I did. 
The next step was making a stencil.  I folded a piece of paper in half and then in half again, then cut out  the shape.  I hope that you all can pretty much see what I did from looking at this picture, because actually explaining it is way beyond me at this moment.  I had to do this a few times to get the shape exactly what I wanted it to look like.  I spent some time looking at designs online. There are tons of great DIY tips on blogs that I found by searching DIY stencil on Pinterest.
This part wasn't an exact science. I basically just laid the stencil on the surface and traced around it with a pencil, and then moved it and traced again.  Pretty easy. I just eyeballed where I needed to place the stencil each time.  I started in the middle and then worked my way to the edges.  That way the pattern in the center would be complete and not broken. 

Next, I filled in the lines with my contrast color.  It looks white, but it is actually a fantastic color called Pirate's Cove or something.  On a wall it sometimes looks blue, sometimes green, and occasionally grey.  I needed to do two coats, as you can see from the picture above. 

It took me a day or two to definitely decide that I wanted the bottom tier to have a chevron pattern as opposed to a striped pattern.  In fact I started to do a purple and green chevron pattern, but like I said as I kept working I just stuck with these two colors.  For whatever reason they really spoke to me.  Or I could have just been too lazy to go shake the other paint cans.

I would like to say that I spent a lot of time being super meticulous and making sure that my chevron pattern was perfectly laid out in some scientifically verified method, but that would have taken too much effort.  Rather I opted to cut 6 inch pieces of Frog Tape and then just try to line them up on top of each other.  I did use a small ruler to sort of measure how far away I put each row of tape from the previous row.  If you spent a long time looking at the table you could tell the it was not an exact science, but really it looks pretty nice the way it is.
Lastly I painted over all the tape and the bottom tier, waited for the paint to dry (well I'm going to tell you guys that I did, but really I waited like thirty minutes and then ripped it all off.) and took pictures of the finished product.
Now I'm as excited as I was when I got this piece as a birthday present. Thanks Mama!

Tuesday, September 30, 2014

Possy and Posette

I recently finished what I think is a hilarious representation of the fictional grandparents of my stuffed pet possum.  Yes, in my mind I have a fantastic family tree for the little guy.  I have this framed heirloom is posted proudly on my bedroom wall, where little Possy and I can admire it and retell the old stories of days gone by.

More to Come

Well it has been about two years.  Which is way too long.  It has just been really hard for me to actually get on the computer with a decent internet connection.  Wether you can believe it or not, there are actually places in the US that still do not have high speed internet.  Yeah, so I end up having to tether to my cell phone connection, and only recently have I had unlimited data over the hotspot connection.  This means hopefully I can finally use this blog again, and post some of the cool things I've been doing.    We will see........
Here is a little sample of one of the things I got into this summer. 

Sunday, September 2, 2012

Olivia Birthday Party

I recently got to throw a birthday party for a friends little girl who was turning 1.  It was a lot of fun, because honestly I just don't get to do enough little girl birthday parties.  We decided on an Olivia party.  We wanted to keep it pretty low key but still have some cute stuff, so here is what I came up with.
I took some Hello Kitty party hats that I had bought last year second hand at a thrift store, and we took them apart and recovered them in red paper and then cut slits in the sides to add precious little pig ears.  Then we taped them all back together.
The cupcakes were red velvet with cream cheese frosting.  They have these really nice cupcake liners at Walmart that are foil lined on the inside so that the pattern on the outside doesn't fade when they are baked.  I got some circle labels and printed them out using the Avery online software and an image of Olivia that was online.  Then I stuck them onto black and white card-stock that I cut out with the cricut, and put those on top of candy sticks with a red bow.  Super easy.
I made sugar cookie dough, and cut out circles with fondant cutters, smaller circles that I quartered to make the ears, and even smaller circles for the nose.  I saw someone else do this with bread dough, and they didn't have cookie or fondant cutters but used a kitchen glass, and bottle cap to get their smaller circles.  The nose slits are chocolate sprinkles.
We had some yummy berry Oreos, and white chocolate dipped strawberries.  Some of the strawberries also had red sprinkles.
All of the food was either red, black, and white, or pig themed.  There were "pigs in a blanket," and pizza bagel bites. The party was in the afternoon after lunch and before dinner, so we were going for snackage rather than a meal.
I think our birthday girl was pretty excited about her first cake!
Over all it was a pretty great party.  I'm glad that I was able to do an extra girly party this year.

Wednesday, August 29, 2012

Monster fun


My mother teaches Kindergarten at a public elementary school.   She is pretty much the best teacher in the entire world.  No seriously.  She decided a few years ago to decorate her classroom with cool monsters, and last year I decided that I would make her a monster class pet.  She bought the "pet" a cute little pet carrier and then every weekend a student has to take the class pet home and take care of it for the weekend.  They are supposed to return to school and tell about everything they did with the monster, and everyone writes about it and they make a little book through out the year with kids pictures and stories.  Well I thought that each year she should get a new monster.  Last year I crocheted the class pet, but I decided to make a fuzzy fleece one this year, so that he would hold up to washing a little better....maybe.
I started by cutting out all my pieces from a sheet on green fleece, and some small triangles from some pink fleece I had.  You can really use a bunch of different colors.  It would probably make it a much cooler monster the crazier it looks.  I cut the pieces that you see here plus a mouth.  I cut the mouth from the pink fleece.  You can see from the picture that I have the fleece folded over so that as I cut out an arm or ear or whatever I'm getting two pieces of fleece.  That way there is a front and a back the same size for each body part.

Then I started by sewing each arm.  Since I was working with fleece I didn't really have to worry about a wrong or right side.  I sewed around the outside of each arm, leaving the short end that attaches to the body open for stuffing.  As I was sewing around the tips of the "hands" I inserted my little pink triangles with the point to the inside and flat edge even with the edge of my green fleece as seen above. Now when you turn the arms right side out you will have cute little claws.  I put three claws on each paw/hand/foot/whatever, except for one which I only attached two claws.  Monsters don't need to be too symetrical (How do you spell that word?).

 Here you can see where I turned the arm right side out and then began sewing the next arm.
So next do the same thing with your ears.  Sew around the outside leaving an opening to turn.  Turn right side out.  Then pinch the bottoms of the ears like this and stitch over your pinch there to hold the scrunching in place.
Stuff your arms.
Now begin by placing all your pieces together.  You will leave one piece of the main body on your table and start placing ears and arms where you want them to go, but on top of and pointing inside your monster.  That didn't make any sense, but just look at the pictures. Then put your other main body piece on top of that and pin around the edges, holding all your arms and ears in place.  You want the open edges of the arms and ears to line up with the outer edge of your main body pieces or extend past the edge.  Make sure that they don't get pushed up into monster where they won't get sewn into place.


Then sew all the way around the outside with maybe a 1/4" to 1/2" seam allowance.  Leave an opening so that you can turn the project right side out and stuff it.  Decide where you feel most comfortable having your opening before you begin sewing around the outside.

Then turn your new little buddy right side out and stuff the sucker with polyfil.  Hand sew you opening closed, and you are almost done.
I then hand stitched on his cute little mouth.  Now you could have sewed the mouth on with the machine before you sewed the two main body pieces together, but this was the look I was going for.  I wanted to add a little more color.  Then I selected three mismatched buttons for his eyes and sewed them on to complete this charming fellow.  He hasn't gotten a name yet, because the class will make suggestions and vote on their favorite.  I think that is all sweet and nice, but last year they ended up naming the monster Star.  Sure, I think thats a nice name for a cat, but a monster?  Oh well.  I'm curious to see what this years class comes up with.

Romper Tutorial to Come

So this is the second of two little rompers that I have made in the last 24 hours.  I'm pretty excited about them.  I want to have my mother in law applique a cute design on the front of each to make them even more precious.  I am planning on making another and then posting a photo tutorial for everyone.  All you will need is your child's measurements.  Hopefully I can get that done this week.  We have been busy with back to school stuff.  I love this time of year.  

Tuesday, July 31, 2012

Fiesta Skirt

I wanted to use more of the fiesta yarn that I had so I decided to make a little skirt to go with the fiesta swing vest. I want to share the pattern that I made for this skirt, but if you read down to the bottom I will try to help explain how to make it for pretty much any size.  This one is for my 2 year old who wears about a size 3.  It is pretty stretchy though, so I'm thinking it is probably about a 2-4 size just like the vest.

Again I used the size 10 circular 16" needle and also a size 7 circular 16" needle, and worsted weight yarn.

Start by casting on 126 stitches onto the size 10 needle.  Join to knit in the round.
Knit the 1st round.  Purl the 2nd round.  Knit the 3rd round. Purl the 4th round.
After this you will just knit.
Each of my stripes is 8 rounds long.
I made 3 stripes then changed colors and knit one round with my next color of choice. Those 3 stripes were about 4 inches of knitting.

After you have completed one round in that color you will decrease the number of stitches on the needle. On this round K1 and then K2tog all the way around.
You will now have 84 stitches on the needle.  Continue with the stripes.
After I had 5 total stripes, or about 7 inches of knitting, I switched to the next color and at the same time switched to the size 7 needle.  I knit 9 rounds in this color.  Since it was a smaller needle I needed to do more rounds to make this stripe a little closer to the size of the other stripes.
Then switch to the next color, which for me was my "fiesta" yarn and also the same color that I started with.  You will now begin knitting the waistband.  K1, P1 all the way around, and continue in this pattern for 18 rounds or twice as long as you want the waistband to be.
Now turn your garment inside out.  Be careful not to let stitches fall off when you are doing this.
You are now going to knit the stitches on your left needle to corresponding stitches on the last round of your previous stripe.  This was the last round before the waistband.

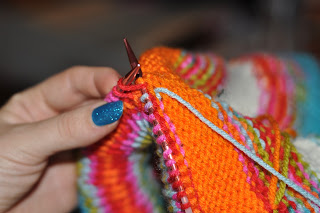
So maybe from these pictures so can see that I have folded the waistband over and basically knit 2 stitches together to create a casing sort of.

Now if you want to it might be a good idea to cut a piece of elastic to the length of your child's waist measurement, and before you completely enclose the casing feed the elastic through the casing and sew the ends together creating a tight elastic waist band inside the casing and finish closing up the casing by continuing to knit 2 stitches together.  I did not do this for this skirt, but I might should have.  If you yarn doesn't keep its springyness (is that a word?) then you will definitely want to use elastic.

As you are doing this knit 2 together thing make sure that you are picking up the correct stitch on your round from the previous stripe.  Just keep checking that if you are knitting a purl stitch that you are picking up a stitch in that same purl row. Did that make sense?  Like just keep checking to make sure everything is aligned.

This is what it should look like once you have knit all the way around.  Your waist band will be on the inside of your circular needles, and the rest of the garment on the other side.  I hope you can tell what I mean from this picture.  Now get your size 10 needle again, and use it to loosely cast off these stitches.
When you have cast off all the stitches this wrong side of your waist band will look like this.
Now you can weave in all the ends where you switched colors and all that good stuff.

You may not need a size 2-4 skirt, and if that is the case it is pretty easy to modify this pattern.

Basically you need to know what your gauge is.  Mine is about 4 stitches by inch.  You will need to measure the hip measurement of your model.  Mine was 21 inches.  Multiply that number by the number of stitches per inch in your gauge.  For me that was 4 so 21 x 4 = 84. Now you want to divide your results by 2 and then add that result back to the number.  So 84 / 2 = 42 and 84 + 42 = 126.  That is how I got my cast on number.   Now if your hip measurement is 24  and your gauge was 5 stitches per inch you would multiply 24 x 5 to get 120.  120 / 2 = 60.  60 + 120 = 180.  180 would be your cast on number.  The only other thing that you would want to change for the pattern is the length of your bottom ruffle perhaps, and the overall length of the skirt.

Good luck and let me see pictures if any one else tries one!